


Your entryway is more than just a way into your home. It’s the first impression, the opening statement, and the emotional welcome your space offers to guests. One of the most effective yet often overlooked ways to enhance this space is by adding molding. Molding has the power to transform plain walls into architectural features, elevate the perceived value of your home, and bring balance, character, and refinement to your entryway. Molding offers endless design possibilities for homeowners at every budget and skill level, from simple trim upgrades to dramatic wall paneling. This article explores how molding elevates your entryway through smart design choices, DIY ideas, and budget-friendly solutions.
Why Entryway Molding Matters
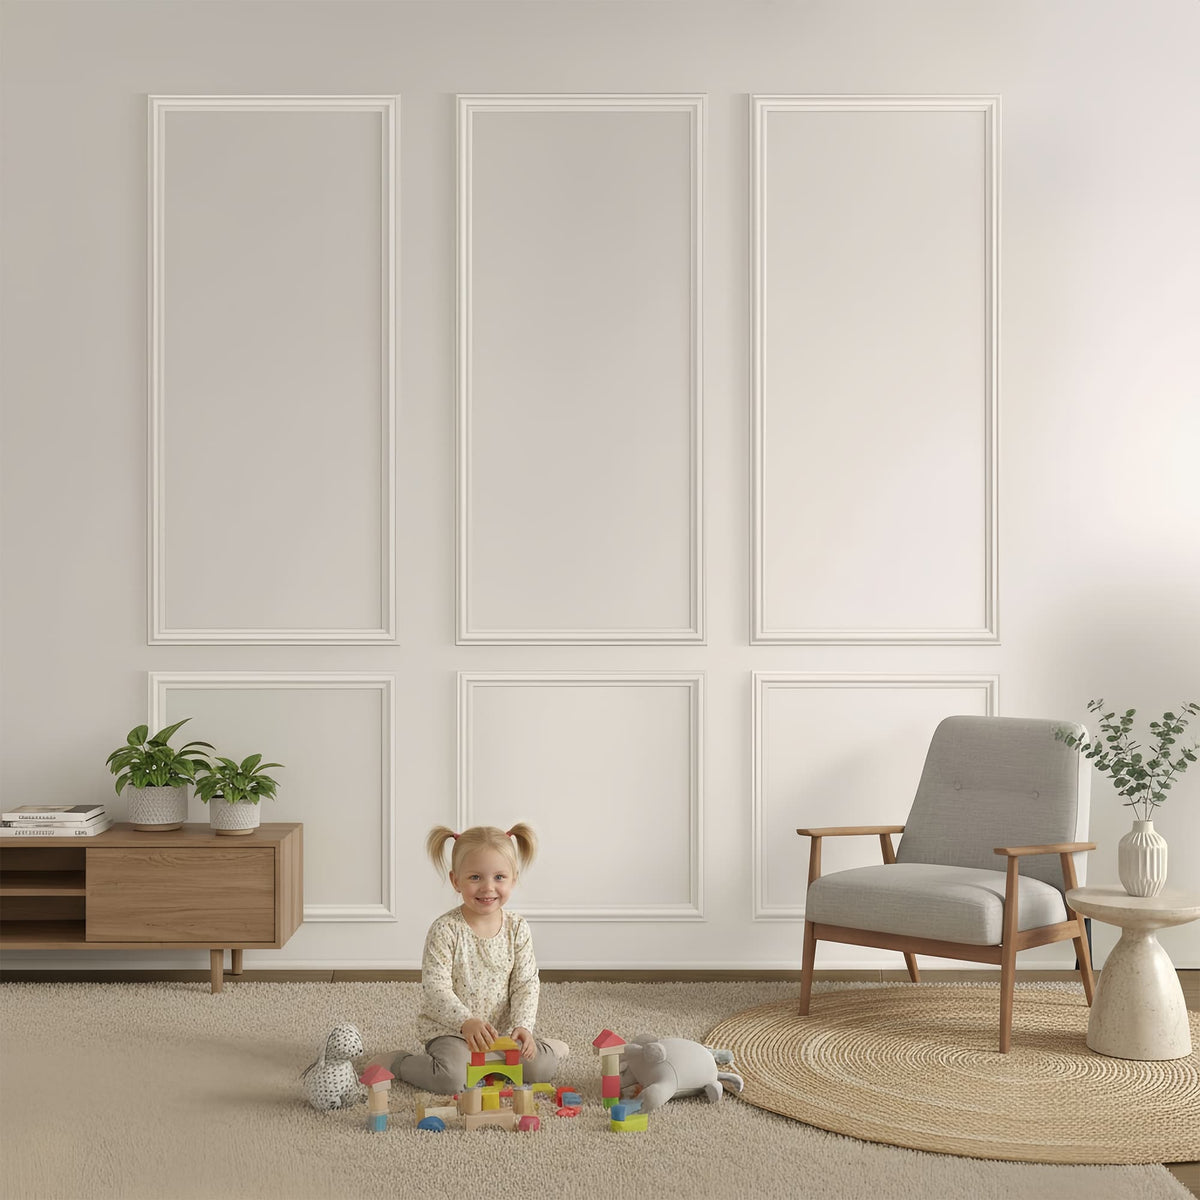
The entryway is the first impression of your home. It sets the tone as soon as guests step inside. Thoughtful molding instantly elevates this space, turning it from ordinary into something refined and welcoming.
First impressions are lasting
The entryway is the first interior space guests encounter. A well-designed entryway immediately communicates care, style, and intention. Molding adds architectural interest that makes the space feel finished and thoughtfully designed rather than bare or overlooked. Even minimal trim can dramatically elevate the aesthetic of an entryway.
Architectural definition
Many entryways lack clear boundaries, especially in open-concept homes. Molding helps visually define the area, creating a sense of arrival without walls or partitions. Panel molding, door casings, or ceiling trim subtly distinguish the entryway from adjacent rooms.
Functional protection
Beyond beauty, molding protects walls from scuffs, bags, shoes, furniture, and daily wear. Chair rails, wainscoting, and panel molding serve as stylish barriers that preserve your walls while enhancing their appearance.
Types of Molding That Work Best in Entryways
Choosing the right molding style depends on your home’s architecture, ceiling height, and personal taste.
- Baseboards: Baseboards ground the space and protect walls from scuffs. Taller baseboards add a sense of luxury, especially in traditional or transitional homes.
- Chair Rails: Chair rails sit about one-third up the wall and add classic elegance. They also protect walls from furniture or heavy traffic.
- Panel Molding: Panel molding creates decorative boxes on walls, adding depth and visual interest. This is especially effective in entryways with tall walls.
- Door and Window Casings: Upgraded casings frame doors and openings, making them architectural features instead of afterthoughts.
- Crown Molding: Crown molding draws the eye upward and emphasizes ceiling height. It gives the room a polished, finished look that instantly elevates the entire space.
Getting Started with Entryway Molding
Transforming your entryway with molding requires thoughtful planning and preparation before the first piece ever touches your wall. Creating this architectural impact starts with understanding your space and selecting appropriate elements.
Assess Your Entryway Space
Start by carefully looking at your entryway. Check the walls and ceiling for uneven areas that could affect installation. Take note of anything in the way, such as light fixtures, vents, switches, or old trim.
Add a small amount of extra length to your measurements to account for cutting errors. Making a simple floor plan on paper can help. Write down wall lengths, door and window locations, and then add about 15% extra for cutting and waste.
Choose a Molding Style That Matches Your Home
Choose molding that fits your home’s overall style. Modern homes look best with simple, clean molding. Traditional homes usually work well with wider or more detailed trim. If your home has a mix of styles, choose molding that blends both looks.
Make sure the new molding blends with the existing trim in your home. This helps everything look connected and well planned. Also, think about how molding will look where rooms meet, especially around doors. Crown molding, door trim, and wall panels all have different uses, so choose what works best for your entryway.
Learn How to Install Molding in Your Entryway
Understanding how to put molding around an entryway is essential for professional results.
- Start with the longest runs: Install long wall sections first before tackling corners and shorter pieces.
- Use precise cuts: Corners typically require 45-degree miter cuts. Take your time measuring and cutting to ensure tight joints.
- Secure properly: Nail molding into wall studs whenever possible. Drill pilot holes in hardwood to prevent the wood from splitting.
- Finish cleanly: Fill nail holes, caulk seams, lightly sand rough spots, and paint for a seamless finish.
DIY Entryway Molding Projects to Try
These easy-to-tackle projects can completely transform your entryway with just a weekend’s work. These DIY molding projects offer significant visual impact without requiring professional expertise.
Simple chair rail installation
Chair rails add instant architectural character while protecting walls from furniture damage. For standard 8-foot ceilings, install the chair rail approximately 32 inches from the floor, roughly one-third up the wall. Begin by locating and marking wall studs, then draw a level reference line around the entryway. For outside corners, cut matching 45° angles to create clean miter joints. Apply wood glue to the back of each piece, secure it with finishing nails, then fill the holes and caulk the edges for a polished look.
Adding panel molding for depth
Panel molding (also called picture frame molding) adds striking depth and dimension to walls. First, determine proper spacing, typically 3-4 inches between boxes and from baseboards or chair rails. Use painter’s tape to map out the panel placement before making any cuts. Cut the molding at 45° angles for the corners, apply liquid nail adhesive to the back, then secure it with a brad nailer. Complete the look by caulking the edges and filling the nail holes.
Framing the door with custom casings
Custom door casings instantly elevate entryway sophistication. Start by attaching 1×4 vertical boards to each side of the doorway, ensuring they're level. Next, install a horizontal 1×2 header across the top, followed by a 1×6 board that sits flush with the vertical pieces. For added elegance, add a decorative chair rail or ornate trim piece as the final layer.
Creating a feature wall with wall molding designs
A custom feature wall makes a dramatic design statement in an entryway. Begin by sketching your design and calculating panel dimensions to ensure uniform spacing throughout the wall. After cutting the pieces to size, temporarily tape them to the wall to confirm the placement and spacing. Apply adhesive to the back of each piece, then secure it with a nail gun. Once installed, caulk all seams and fill the nail holes for a seamless, professional finish.
Creative Entryway Molding Ideas
Entryway molding is not just functional, it can also showcase your unique personal style. With the right design, simple trim can become a standout feature.
1. Use bold colors for contrast
White trim is classic, but bold colors make a stronger impact. Light blue molding with soft yellow walls feels warm and welcoming. Peacock blue brings a vibrant, tropical vibe. Bold hues like orange-red work well in entryways as they are high-traffic spaces that benefit from a pop of color. Navy is another great choice. It exudes elegance and complements most color palettes.
2. Mix molding with wallpaper or paint
Molding and wallpaper pair perfectly together. Molding adds structure and definition, while wallpaper infuses the space with personality. In small entryways, install a chair rail or board-and-batten treatment on the lower wall and wallpaper above it. You can also frame a wallpaper accent within molding panels to create a custom artful focal point. Always install the molding first, then apply wallpaper inside the frames.
3. Highlight lighting with ceiling molding
Ceiling molding can accentuate your entryway lighting fixtures and make them the focal point. It draws the eye upward and adds depth to the space. A chandelier looks even more striking when framed by decorative ceiling molding. Choose a fixture that suits the scale of your entryway and aligns with your home’s design style. Simple crown molding pairs especially well with decorative lighting fixtures.
4. Add hooks or knobs to molding panels
Molding can also serve a practical purpose. Mount hooks or knobs to the panels to hang coats, bags and hats. Board-and-batten walls with integrated hooks maximize space and keep the entryway organized. This is an especially practical solution for small homes. Choose hooks that align with your aesthetic, such as sleek modern metal pieces or timeless vintage designs.
Budget-Friendly Home Improvement Ideas
Creating an elegant entryway with molding does not require a large budget. With strategic choices and creative solutions, homeowners can elevate their entryways on a budget.
1. Use MDF or pre-primed molding to save money
MDF (Medium-Density Fiberboard) is one of the most affordable and widely used options for molding. It has a smooth surface, is easy to cut, and looks great when painted. MDF performs well in dry areas like entryways but is not suitable for bathrooms or other moist spaces as it can absorb moisture and swell. Pre-primed MDF trim saves even more time as it comes prepped and ready for painting. Despite its lower cost, MDF delivers a clean, polished and elegant finish to any entryway once installed.
2. Paint existing trim for a fresh look
If you are not ready to install new molding, refreshing your existing trim with a fresh coat of paint can still make a dramatic difference. Trim requires much less paint than walls, so it’s a low-cost update. You can opt for light-hued trim for a classic aesthetic, dark trim for a modern feel or even paint the trim and walls the same color for a seamless, streamlined look. Worn wooden trim can also be sanded and repainted instead of being replaced.
3. Combine molding with peel-and-stick wallpaper
Molding looks even better when paired with peel-and-stick wallpaper. These wallpapers are easy to apply and remove without damage, making them an ideal choice for renters. You can also use self-adhesive molding or command strips to mount trim without causing any damage to the walls. This combination achieves a high-end aesthetic without the high price tag or permanent modifications.
4. Reuse leftover trim for small details
Don’t discard leftover molding scraps. These small pieces can be used to frame mirrors, artwork or even entryway furniture. You can also add trim detailing to an entryway table or cabinet to create a custom look. These small design touches help unify the entire entryway aesthetic while keeping costs minimal.
Conclusion
Entryway molding is one of the most effective ways to elevate your home’s aesthetic and value without undertaking major renovations. It adds character, structure, and sophistication while protecting walls and enhancing functionality. Whether you choose simple chair rails, elegant panel molding, or bold feature walls, molding transforms your entryway into a welcoming, memorable space.
The beauty of entryway molding lies in its versatility, with options to suit every design style, budget and skill level. Even small molding updates can dramatically enhance the overall feel of your home. Your entryway deserves more than plain walls and basic trim, it deserves intentional architectural design. Start small if you need to but start somewhere, because the transformative impact of molding on an entryway is impossible to overlook.